Getting the metal textures like I wanted was not easy.
I wanted to "own" the work, not "borrow" it.
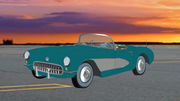
I photographed a lot of cars and shiny machinery and cropped pieces out and saved as PNG.
Some parts were modeled and filled with an image texture.
For some more difficult parts I grouped the part layer underneath a box or oval.
Set the part up as a mask and used transform layer to place it.
Besides moving it, you can stretch and shrink the image to get the look you want.
I know the body parts can use more shading work, but so far I haven't learned a way that I can make work.
Thanks for explaining how you made the metal look so good.
WesHowe wrote: ↑Sun Aug 18, 2024 12:39 pm
I know the body parts can use more shading work, but so far I haven't learned a way that I can make work.
- Wes
I mostly shade in a basic way, rarely anything fancy. But if I wanted to do some fancy shading, I would start with a shadow shape with a dark gradient and put it inside a mask group.
A gradient needs at least 2 assigned colors, but one of those colors can be 100% transparent. With that in mind, I might try using a 100% transparent color in the gradient, as the color of the car would show through (with the dark gradient on top). Then I could move the points of the shadow shape until I liked how it looked. I would also use the effect Soft Edge on the fill of the shadow shape (set pixels to somewhere around 3), and not use a stroke.
The trickiest thing, aside from all the masking rules, is learning the circle-line-circle thing that appears in the gradient. Use it by dragging one of the circles, and the other circle moves the whole thing. It modifies the size of the gradient and rotates it.
After you select a shape and add the gradient effect (in the Style window), the circle-line-circle thing appears on top of the shape, in the workspace.
One circle is hollow, one solid. Drag the hollow circle and the gradient within the shape should start changing. Move the solid circle to reposition.
To the right of the word "Gradient" in the Style window are 3 dots. These are important. Click them to chose your colors. Note: you can have more than 2 colors in your gradient (blue, green, blue, for example), and you can delete colors.
Later, when you want to go back and change the gradient's colors, select the shape.
Oh, one more thing. If you make an awesome gradient, you can re-use it in multiple shapes. Select the shape with the awesome gradient, then click Copy, located near the bottom of the Style window. This copies everything about the shape's style.
Then select the other shape, the one without a gradient, and click Paste, located near the bottom of the Style window. This will add the awesome gradient to the shape.
Hoptoad wrote: ↑Tue Aug 20, 2024 4:00 am
After you select a shape and add the gradient effect (in the Style window), the circle-line-circle thing appears on top of the shape, in the workspace.
When I first choose Gradient I get the same box that appears as if I had clicked the three dots.
Setting additional colors and making the ramp in that box I understand.
But I have never see a circle-line-circle thing appear.
There must be something different in my setup.