Specifically if upper and lower arm are not seperated?
Is there ans way to patch if needed or move the hand part in Z space?
Moderators: Víctor Paredes, Belgarath, slowtiger


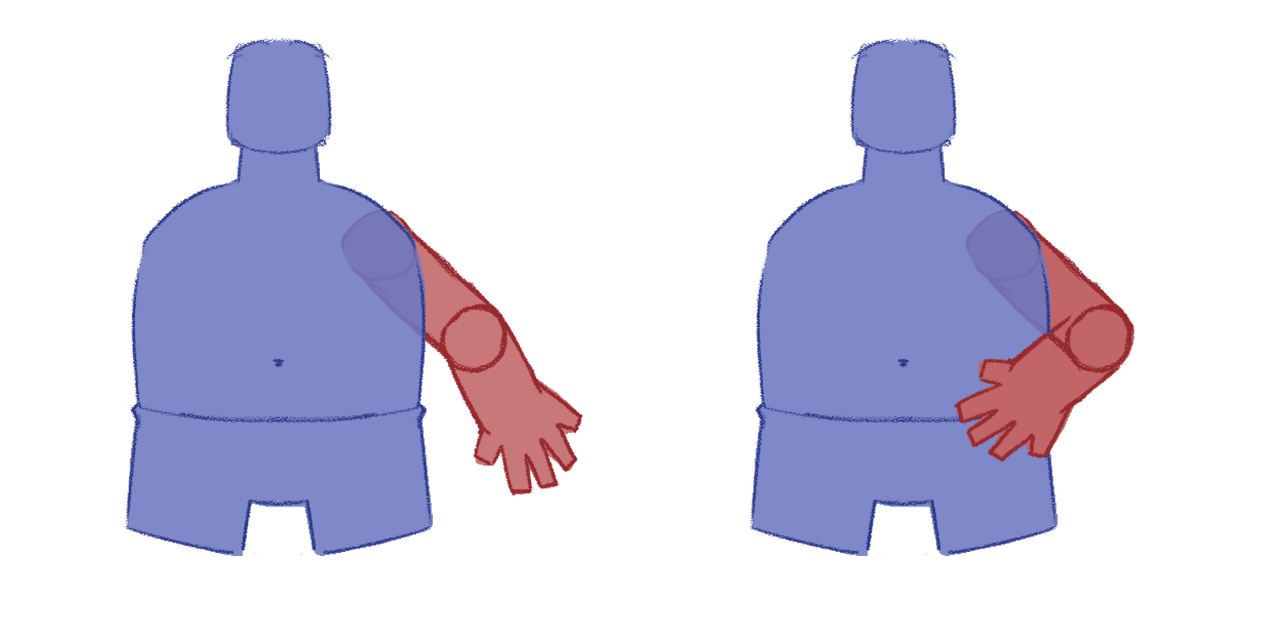
Slightly off topic question but how do you get the elbows to work so seamlessly with your method, Greenlaw? I've been looking for a nice, easy way for doing limb rotation without having to go mad with drawing circles etc. and your way makes a lot of sense (i've been doing it KINDA like this). But obviously if i rotate the arm now, there's a huge gap so i was just wondering how you get the elbow working or is it just a SmartAction?Greenlaw wrote: ↑Fri Jun 21, 2024 7:59 am There are many ways to do this. For your example, I'd draw the arm as a single item divided into two shapes that appear as a single seamless shape...
This is done by hiding the 'border' line segment at the elbow using the Hide Edge tool. Here's an image showing the elbow edge hidden. (Fills in Display Preview have been disabled to make the setup more obvious)...
Then, I duplicate the layer and knock out the shape in the upper section for one layer and the lower section in the other layer. I also add a single point to the 'border' line in one layer and drag it across the border. This helps hide the seam that can appear in an anti-aliased final render.
(In the above example, the edge-overlap is in the upper arm layer. Typically, it doesn't matter which layer has this overlap, but it could matter for some character designs. Use your judgment.)
Next, I create reference layers for both layers and move them behind the torso, so we have one complete arm set in front and one behind. This allows me to hide and reveal the sections of the arm to create the appearance of the arm 'wrapping' around the body. (Actually, I created duplicate layers in this example, not reference layers, but reference layers typically make sense when editing the original. I often break the arm references for my final 'master' rig, though, to avoid possible issues when the character rig is referenced in a scene project.)
Finally, a Smart Bone Dial is created to control the visibility of the layers.
Here's the above setup animated...
Another way is to animate the layer order inside an action. This approach is simpler and more direct, but it can also invite conflict when you need to do something differently from what the Smart Bone Action is programmed to do. For this, I prefer the visibility technique. With the animated visibility setup, I can still use Animated Layer Order additionally when it's needed. It's rare, but it comes up from time to time.
A good example is the Centipedior and Ladybug Lad characters I animated, as seen on my 2020 demo reel. The multiple sets of arms could have complicated this setup, but I kept it fairly simple by combining animated Visibility and Layer Order setups. It's good to maintain flexibility for surprise situations.
I've also used masking to control the visibility of layers. In this example, I used an animated Stroke Exposure as a mask to show and hide the arm sections...
In the Puss example, I used Smooth Joint for the elbow, then inserted a single curve running up the arm's length. A stroke slightly wider than the arm's width runs up and down the curve and serves as a mask.
The Stroke Exposure method seemed like a great idea back then, but it's actually overkill for most character rigs. I think it's a fun technique, but really more for show.
The visibility switch method is what I use most of the time. I used it throughout the run of Boss Baby: Back In Business and other TV shows. It's easy to set up, looks seamless, and it works perfectly every time.
Hope this helps.
Really good, just tried this out and works like a charm, thank you ^^Greenlaw wrote: ↑Thu Jun 27, 2024 9:24 am Hi Joel,
There are many ways to rig elbows, but the method I usually fall back on is adding an elbow bone. (Another trick I picked up from working with the amazing Victor.)
The elbow bone is parented to the tip of the upper arm bone and rotated perpendicular to it. The direction doesn't matter. The elbow bone is then constrained to rotate 50% of the lower arm bone's rotation. If it doesn't move at half the rotation, try entering -50%.
The points in the arm artwork's elbow are then point-bound to an elbow bone. The result is that the elbow bone holds the elbow region's volume in a bend, so I don't have to adjust it with a Smart Bone Action.
To get the sharp kink on the elbow's inside, I start with smooth points on both sides of the elbow at frame 0. Then, in the arm bend Action for one direction, I set a Peak Curvature point (Ctrl-P) at a slightly later frame. This creates a transition into a sharp fold. (Also, be sure to set a keyframe at frame 1 of the Smart Bone Action; this ensures that the Mainline's frame 0 interpolation doesn't affect the range of the Smart Bone Action.) The outside of the elbow should be left smooth for the entire Action, but I might adjust the curvature on the last keyframe to make it slightly 'pointier'.
For the secondary Smart Bone Action action, I swap the animation of the elbow points.
Update: I just looked at my example above, and you can see the elbow bone in it. Typically, I set this bone to Shy Bone because it should never be keyframed on the Mainline.
Fold lines, a detail that can suggest which way the arm is pointing relative to the camera, are the next level. There are many ways to handle this detail, too. I'll cover this and also describe other elbow/knee joint techniques pretty soon.
Works like a charm! And super easy to setup! Will use it from now on.
If I understand correctly both methods duplicate the arm Layer while keeping it bound on the same bone and rearranging the layer position.Greenlaw wrote: ↑Fri Jun 21, 2024 7:59 am The Stroke Exposure method seemed like a great idea back then, but it's actually overkill for most character rigs. I think it's a fun technique, but really more for show.
The visibility switch method is what I use most of the time. I used it throughout the run of Boss Baby: Back In Business and other TV shows. It's easy to set up, looks seamless, and it works perfectly every time.